How to Check PC Specs on Windows 11 and 10: CPU, RAM, GPU, Storage
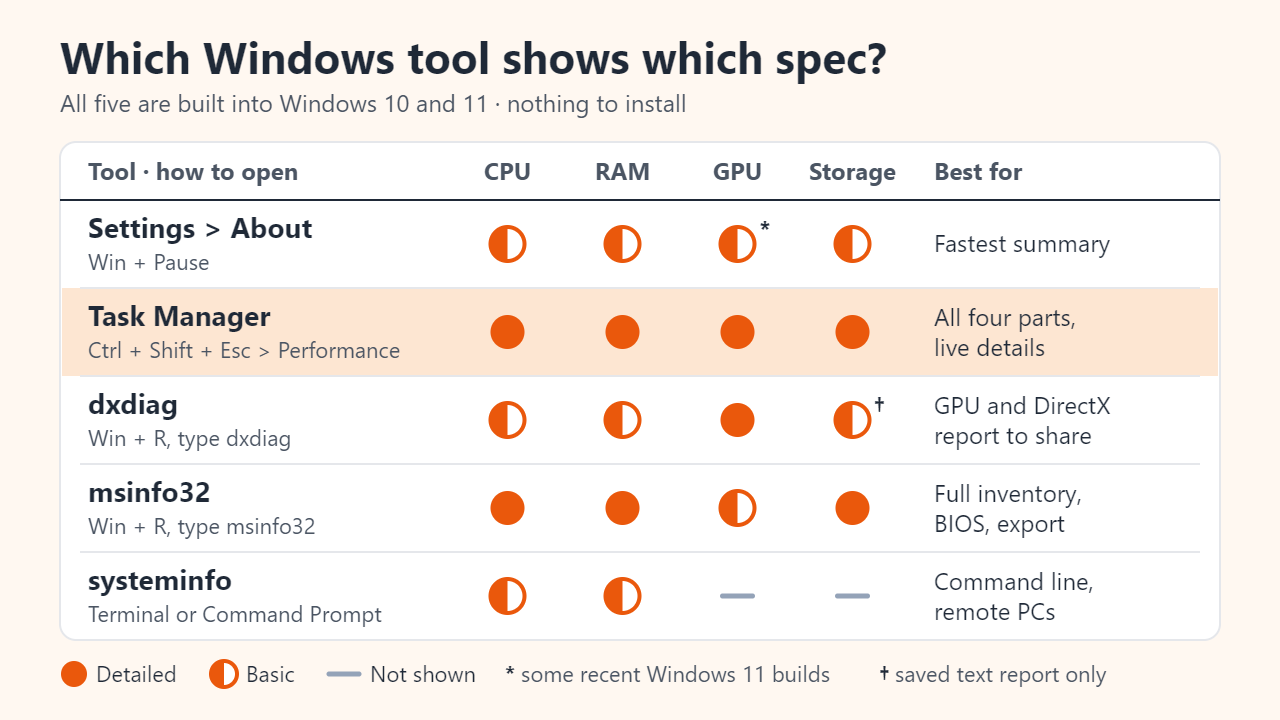
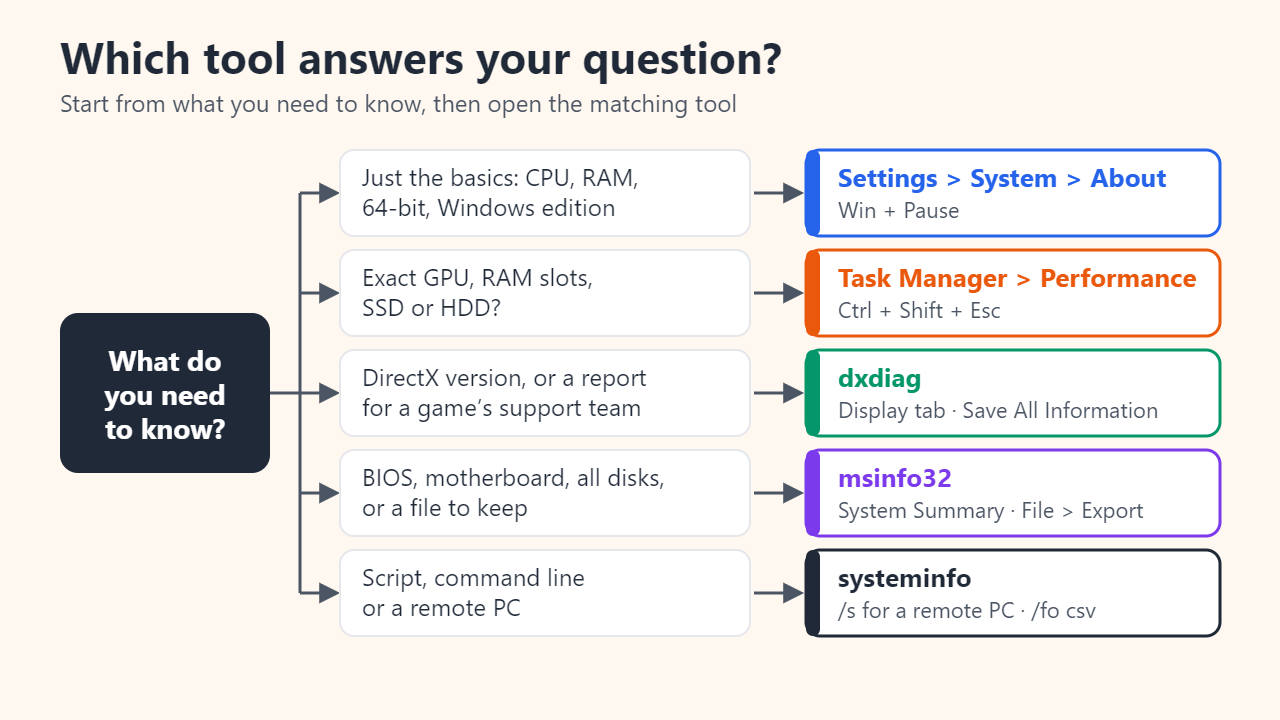
To check your PC specs on Windows 11 or 10, press Windows logo key + Pause or open Settings > System > About to see the processor, installed RAM and whether Windows is 64-bit. For the graphics card and drives, press Ctrl + Shift + Esc and open Performance in Task Manager, which shows the GPU and its memory plus each disk's capacity and type. When you need a full report to save or send, run dxdiag or msinfo32.
Method 1: Settings > System > About (Windows + Pause)
This is the quickest summary and the page Microsoft points to for device specifications.
- Press Windows logo key + Pause. On Windows 11 it opens Settings at System > About; on Windows 10 it opens System Properties. No Pause key? Press Windows + I and choose System > About, or right-click Start and pick System.
- Under Device specifications, read Processor (model name and base speed), Installed RAM and System type, for example "64-bit operating system, x64-based processor".
- Under Windows specifications, note the edition and version, which software requirement lists often name.
Microsoft keeps redesigning this page. Recent Windows 11 builds rename the section Device info and may add graphics and storage cards at the top, but not every PC shows them, so use Task Manager for GPU details. For free space on each drive, open Settings > System > Storage.
Method 2: Task Manager's Performance view for GPU, RAM and disks
Task Manager is the best single place to see all four components. Press Ctrl + Shift + Esc, click More details if it opens in the small view, then select Performance (an icon in the left pane on Windows 11, a tab on Windows 10). Each device has its own page:
- CPU: the full model name at the top right, plus base speed, sockets, cores, logical processors and cache sizes.
- Memory: total, speed, Slots used (is there room to add a module?), Form factor (DIMM on desktops, SODIMM on many laptops) and Hardware reserved.
- Disk 0, Disk 1…: model, capacity, whether it is the system disk, and type (SSD or HDD; newer Windows 11 builds add NVMe or SATA).
- GPU 0, GPU 1…: card name, dedicated and shared GPU memory, driver version and date, DirectX version and physical location.
Laptops with both integrated and discrete graphics list two GPU pages, numbered by physical location rather than by speed, so check both. A GPU page appears only if the graphics driver supports WDDM 2.0 or later.
Method 3: dxdiag and msinfo32 for full reports
dxdiag (DirectX Diagnostic Tool) is the classic way to check a GPU. Press Windows + R, type dxdiag and press Enter. The System tab shows the processor, memory and DirectX version. The Display tab (some laptops add a second Display or a Render tab) shows the card name, manufacturer, display memory split into dedicated and shared, the driver model (WDDM) and supported feature levels. Save All Information writes everything to a text file, which support staff often request; that file even lists each drive's model and size.
msinfo32 (System Information) is the most complete built-in inventory. Run msinfo32 and stay on System Summary for the processor with its core count, system model, BIOS version and date, baseboard (motherboard), Installed Physical Memory (RAM) and Total Physical Memory. Expand Components > Storage > Disks for drive models and sizes, and use File > Export to save a text report. Don't trust Adapter RAM under Components > Display: it comes from a 32-bit WMI field that cannot express 4 GB or more, and on our test laptop it read 2.00 GB while dxdiag reported 128 MB dedicated.
Method 4: the systeminfo command
For plain text, open Terminal or Command Prompt and type systeminfo. Microsoft describes it as a report of operating system configuration and hardware properties; /s queries a remote computer and /fo csv produces spreadsheet-friendly output. Useful lines include OS Name, System Model, System Type, BIOS Version, Total Physical Memory and Available Physical Memory. To pull out one line, pipe it: systeminfo | findstr /C:"Total Physical Memory".
Know its limits. Processor(s) shows a family code such as "Intel64 Family 6 Model 186 Stepping 2" instead of the product name, there is no graphics card or disk model, and Total Physical Memory is the usable amount, not the installed amount.
Reading the results against a requirement list
Game and software requirement lists use a handful of lines. The table shows where to check each one and the most common mistake; the requirement values are illustrative.
| Requirement (illustrative) | Where to check | Watch out for |
|---|---|---|
| 64-bit Windows 10 or 11 | Settings > About: System type, Edition | Windows 10 can be 32-bit; Windows 11 is always 64-bit |
| A named 6-core CPU | Task Manager > CPU | Compare model and generation; GHz alone misleads |
| 16 GB RAM | Settings > About: Installed RAM | "15.7 GB usable" on a 16 GB PC is normal |
| GPU with 6 GB VRAM, DirectX 12 | Task Manager > GPU; dxdiag Display tab | Count dedicated memory only; check feature levels |
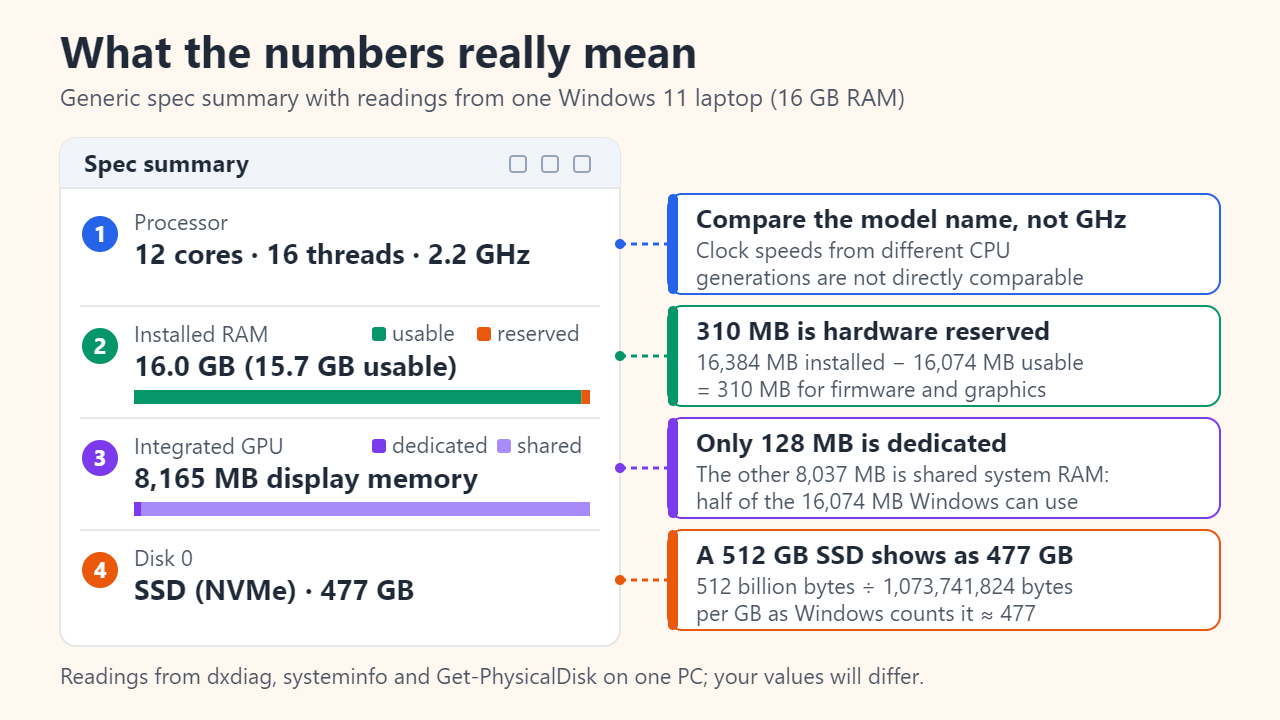
| 50 GB free on an SSD | Settings > System > Storage; Task Manager > Disk | A 512 GB SSD shows as about 477 GB |
Installed vs usable RAM
Windows can't use every byte you install: firmware and devices, especially integrated graphics, reserve a slice first. On a test laptop with 16 GB and integrated graphics, dxdiag reported 16,384 MB of memory and 16,074 MB available to Windows, so 16,384 − 16,074 = 310 MB was hardware reserved, and 16,074 ÷ 1,024 ≈ 15.7 GB usable. That machine still counts as 16 GB on a requirement list. If several gigabytes are missing, make sure Maximum memory is unticked in msconfig (Boot > Advanced options) and check how much memory the firmware assigns to integrated graphics.
Dedicated vs shared GPU memory
The same laptop's dxdiag Display tab listed 8,165 MB of display memory, yet only 128 MB was dedicated. The other 8,037 MB was shared system RAM, exactly half of the 16,074 MB Windows can use, which matches Microsoft's note that Windows lets a GPU borrow up to half of physical memory. When a game asks for 6 GB of VRAM, compare the dedicated figure on a discrete card, never the shared or total figure.
FAQ
How do I check which graphics card I have?
Open Task Manager > Performance and select each GPU page, or run dxdiag and open the Display tab. Device Manager > Display adapters also lists every graphics chip by name.
Where do I find my motherboard and BIOS version?
In msinfo32's System Summary, look at BaseBoard Manufacturer, BaseBoard Product and BIOS Version/Date. systeminfo prints the BIOS version too.
How do I save my specs to send to someone?
Use dxdiag's Save All Information for a text file, or msinfo32's File > Export. From Command Prompt, msinfo32 /report followed by a full path, such as C:\Users\Public\Documents\specs.txt, writes the same report as a text file; it can take a few minutes.
Sources: Microsoft Support: Find information about your Windows device; Microsoft Support: Keyboard shortcuts in Windows; Microsoft DirectX Developer Blog: GPUs in the Task Manager; Microsoft Learn: msinfo32 command reference
Related reading
Original illustrations created to help explain this article.