Showing Hidden Files in Windows 11: Finding AppData While Preserving Important Files
This article was translated from its source language with AI assistance. Please check technical terms and equations against the original.

If instructions mention AppData but it is absent from File Explorer, check hidden-item visibility first. Windows 11 can show hidden items through View. But finding previously invisible files and deleting or changing them require different judgments. A visible folder does not automatically become a cleanup target.
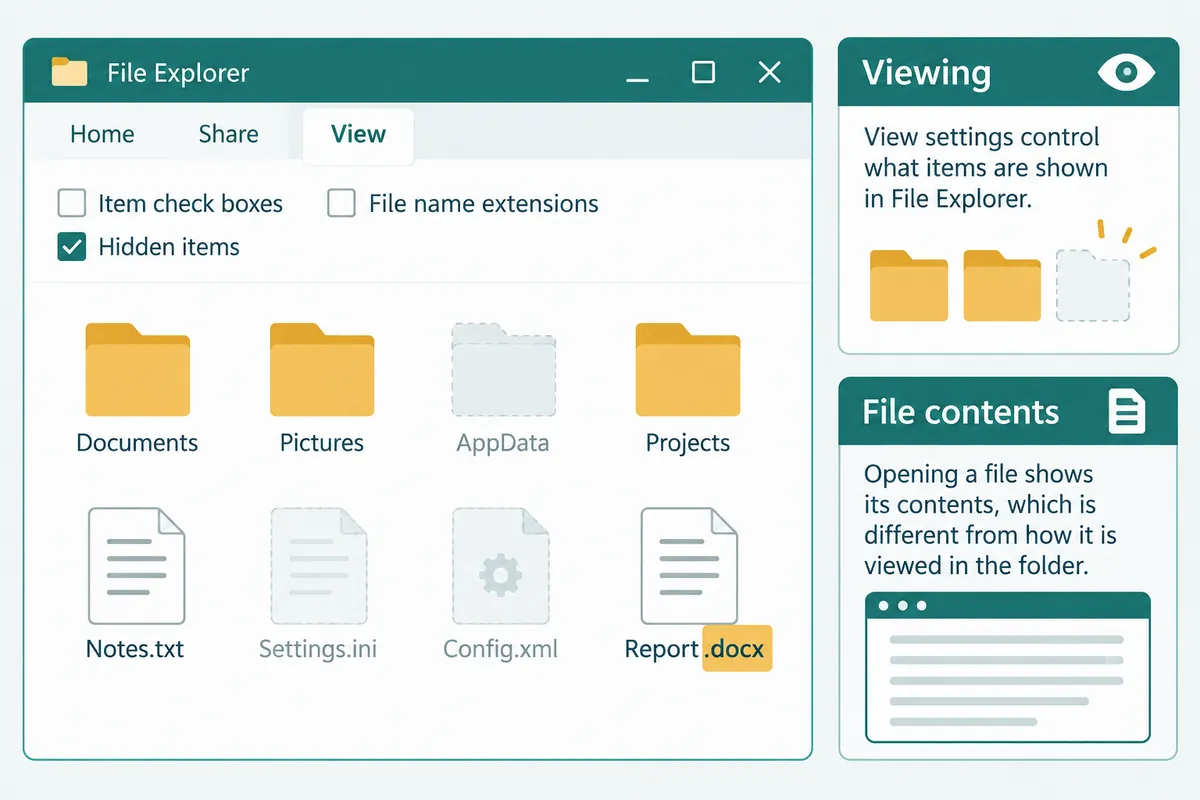
This article covers basic hidden-file and extension settings, distinguishing wrong paths, and keeping necessary copies. Bulk deletion of system folders or disabling every protected-file visibility restriction is not a basic step needed for finding files.
1. Hidden items and extensions are separate settings
Hidden items are files or folders designated not to appear normally. Extensions at the end of names indicate format and help choose apps. Showing hidden items does not change formats, and showing extensions does not automatically reveal every hidden folder.
| Setting | What it checks | What remains unchanged |
| Show hidden items | Display files and folders with hidden attributes | Importance and whether deletion is appropriate |
| Show file extensions | Suffixes such as .pdf, .docx, and .zip | Actual internal format |
| Select search scope | Folder or drive being searched | Original location and contents |
| Copy file | Create a copy elsewhere | No guarantee that deleting the original is safe |
For example, hidden extensions may make “Report.pdf” appear as “Report.” Revealing .pdf is not conversion. Renaming its suffix .docx does not turn a PDF into Word.
2. Show hidden files in Windows 11
- Open File Explorer with Windows key + E.
- Select the topViewmenu.
- Show → Hidden itemsor enable the corresponding hidden-items option.
- Check the desired folder address and file name.
- After viewing, turn the same option off if you want to restore previous visibility.
Windows 10 may use the View tab or Folder Options. If your screen lacks View → Show, check Windows version and use the corresponding official instructions. Do not force different-version screens into one route.
Even if faded files appear, do not delete based only on names. The setting reveals files, not their purpose. App folders can contain necessary information even when the app is not running.
3. Check the user-account path for AppData
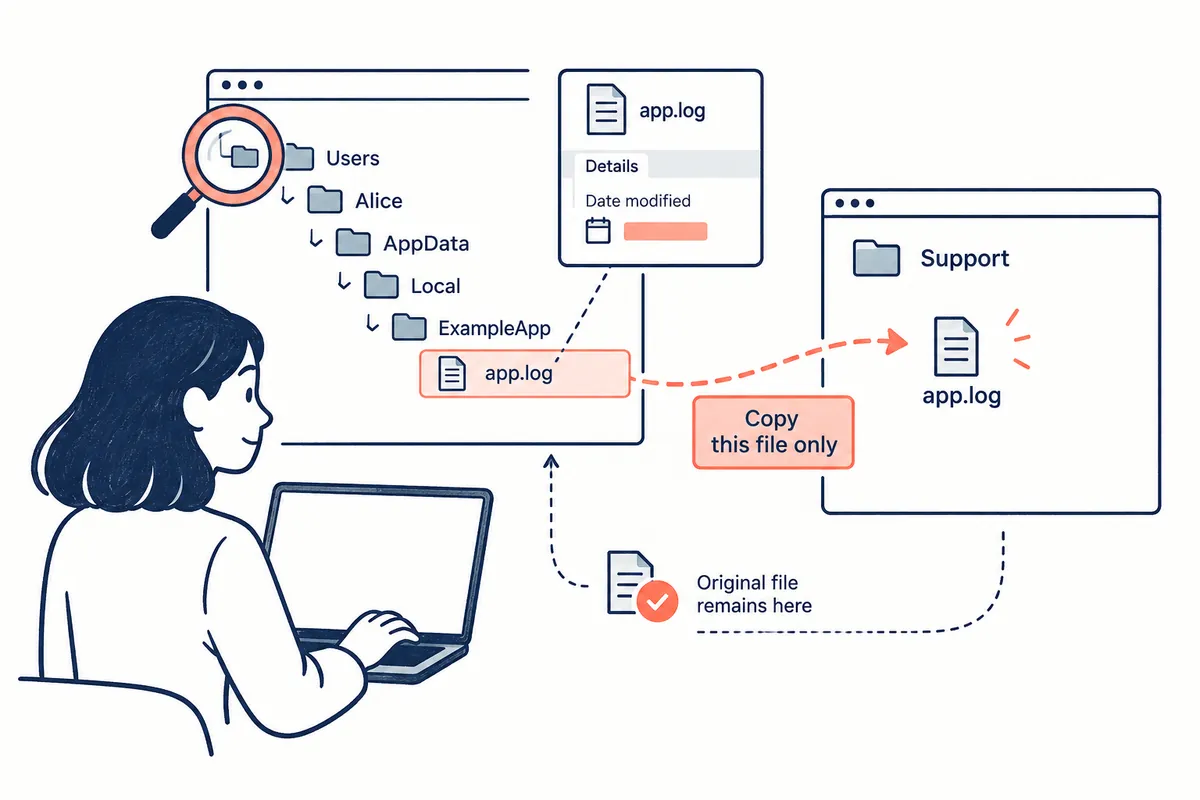
First verify the correct current user folder. PCs with several accounts can have similarly named folders. In the illustrative C:\Users\UserName\AppData path, “UserName” must be your actual account folder.
Even folders known to contain settings or temporary data vary by app. Names such as Local and Roaming do not mean everything automatically regenerates. Find exact folder and file names in the app's official documentation.
If support specifies one log path, the purpose is checking that file, not clearing all AppData. Compare app and log times and prepare only necessary copies. Logs may contain accounts and work paths; inspect before sharing.
4. Hidden settings are not the only reason files are missing
If files remain absent after revealing hidden items, recheck path, account, and save location. Quick access and recent-file lists are not actual folder locations. Removing a recent entry does not necessarily delete the file, and absence from the list does not mean it was never saved.
| Question to check | What to inspect | Next action |
| Is this the correct account folder? | User folder in the address bar | Compare with the recorded save path |
| Was it saved in cloud storage or another drive? | App save location and file list | Find it at the actual location |
| Did the name change? | Partial name, modification date, and extension | Narrow search with remembered conditions |
| Is a permission message shown? | Error and managed-account status | Ask the responsible person about required access |
Permission errors are separate from hidden visibility. Instead of repeatedly changing View or arbitrarily taking folder ownership, check who uses the file and why access is needed. For work material, follow organizational shared locations and access procedures first.
5. Show extensions and distinguish actual formats
Enable View → Show → File name extensions in Windows 11 File Explorer. Visible suffixes distinguish similar documents and executables. Illustrative “Material.pdf” and “Material.pdf.exe” may look similar but end differently.
Check file properties, source, and intended app alongside names. Keep a copy before trying to open through extension changes. Necessary conversion uses app Save or Export; renaming alone changes no contents.
For Korean names or multiple dots, inspect the final suffix carefully. If the full name is forgotten, search partially within the folder and compare dates and size. The newest same-name file is not always the submission version; open and inspect contents too.
6. Procedure for keeping necessary copies
- Check the actual path and purpose of the file to copy.
- If an app uses it, follow its guidance on saving or closing.
- Copy to another folder instead of moving or cutting the original.
- Check needed conditions such as copy name, size, and ability to open.
- If the original needs changing, check official app procedures and record scope.
Making a copy does not justify clearing the original folder. Copying a few settings files may not transfer an app successfully to another PC. Ordinary document storage and app-setting migration have different purposes and procedures; do not bundle them indiscriminately as “backup.”
For an illustrative support log, record “file location, app name, occurrence time, copy date.” This is a record format, not measured results, and helps distinguish new and old logs.
7. Separate finding from cleanup
If low storage led you to hidden folders, only inspect what exists at this stage. Consider cleanup through descriptive routes such as Windows Storage settings or app cleanup functions. Revealing AppData does not justify manually emptying it.
For a specific app error, follow official exact-file instructions with recovery steps. Do not apply another app's solution to a similarly named folder. Deleting unverified paths and relaunching can lose necessary user settings.
| Task purpose | Necessary check | Action to defer |
| Find file location | Address, name, and extension | Deletion or renaming |
| Prepare support logs | Documented app path and occurrence time | Sending the entire folder |
| Store documents | Copy opens and original location | Moving originals before verification |
| Resolve app errors | Official procedure, version, and recovery | Reusing another app's solution |
8. Restore visibility and retain records
After checking, restore hidden visibility if desired. This hides files in the view; it does not delete them. Extensions help identify format and can remain visible. Choose the two settings separately.
- Did you verify address-bar path and current account?
- Did you distinguish hidden items from extension visibility?
- Did you compare contents and times to identify needed material?
- Did you check copies and official procedures before changes or deletion?
- Did you inspect support files for personal information?
Changing hidden visibility cannot reveal nonexistent files. Deleted files or files saved elsewhere need appropriate finding or recovery procedures. Distinguishing paths from existence explains viewing issues versus actual data problems more accurately.
Official sources and writing basis
Sources checked: October 3, 2026. Written by AI using official Microsoft guidance, with content and sources reviewed. Cases and inspection records help readers assess their situation; they are not measurements or tests on a particular PC. Screens and menu names may differ with the Windows build, manufacturer, and management policy.
Original illustrations created to help explain this article.
Original on Tistory ↗