Python venv Tutorial: Create, Activate and Delete a Virtual Environment
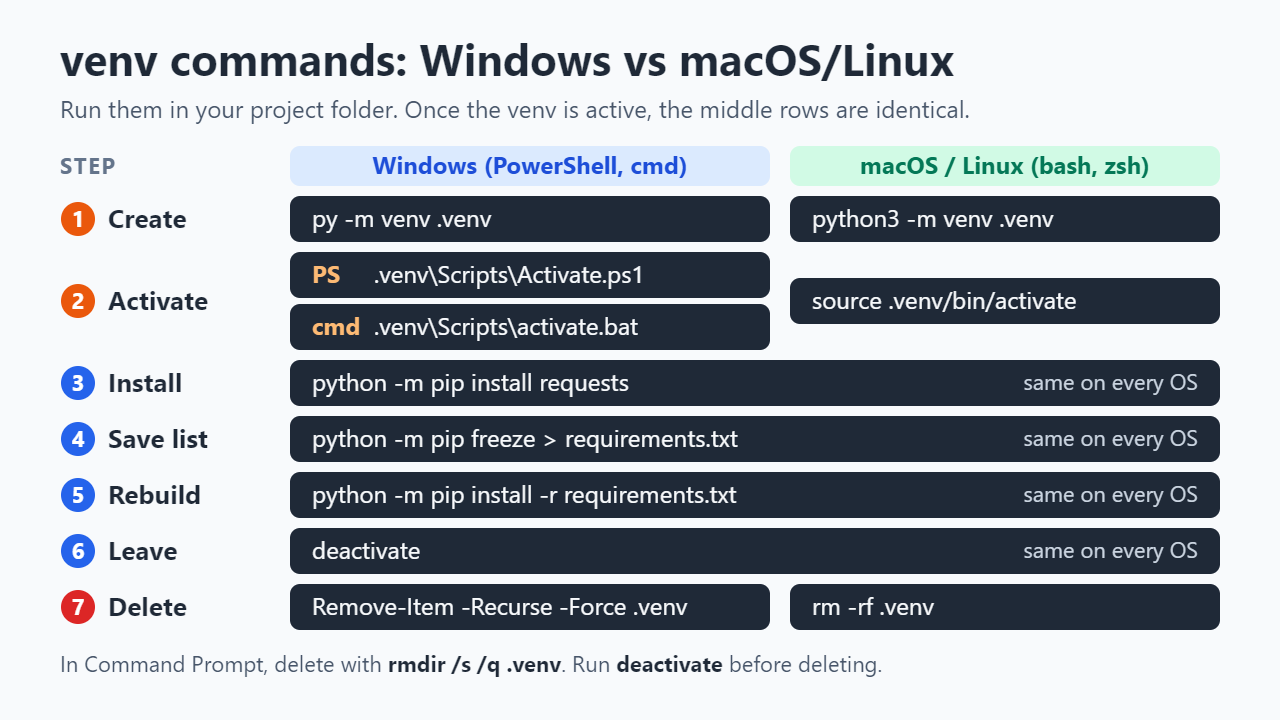
To create a Python virtual environment, open a terminal in your project folder and run python -m venv .venv (on Windows the launcher form py -m venv .venv works too; on macOS and Linux type python3 -m venv .venv). Activate it with .venv\Scripts\Activate.ps1 in PowerShell, .venv\Scripts\activate.bat in Command Prompt, or source .venv/bin/activate on macOS and Linux. From then on, pip install puts packages only in that project's .venv folder, and removing the environment is as simple as running deactivate and deleting the folder.
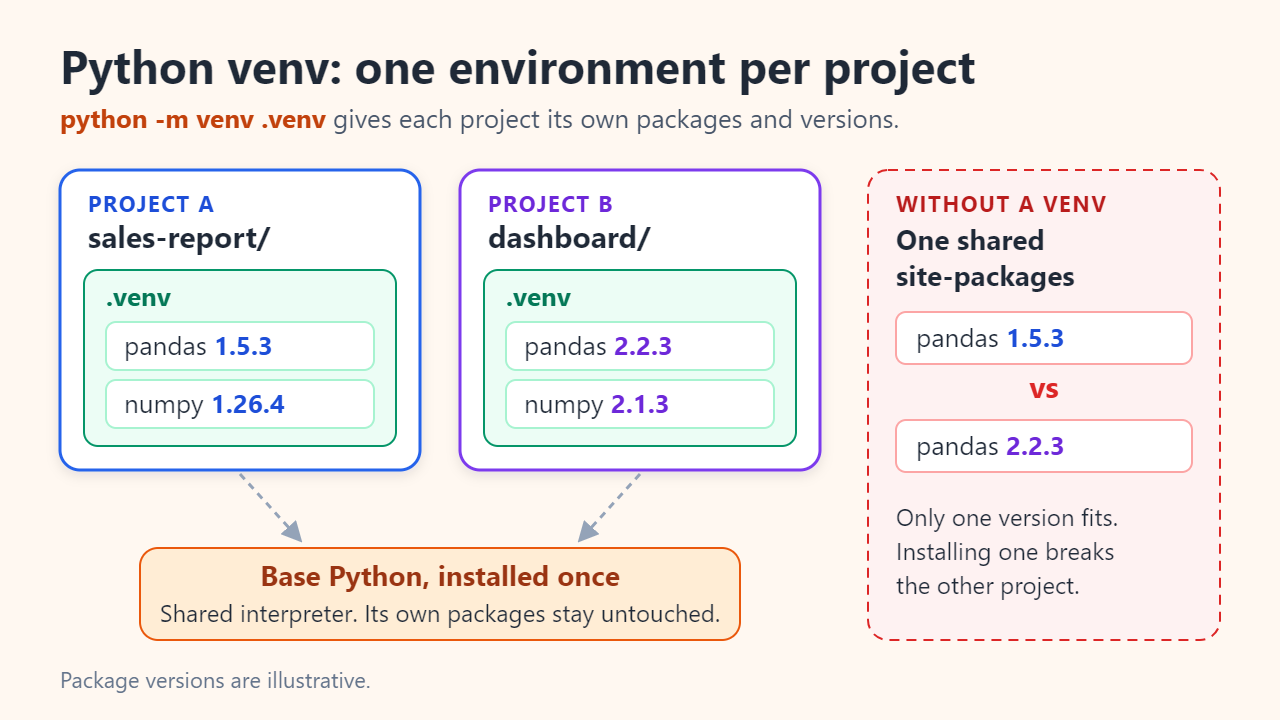
Why use a virtual environment?
Without a virtual environment, pip installs packages into a site-packages folder that every project using that Python shares. If Project A was written for an older pandas release and Project B needs a newer one, that single folder cannot hold both: upgrading for B can quietly break A. A virtual environment fixes this by giving every project its own private package folder.
The venv module has been part of the standard library since Python 3.3, so there is nothing extra to install. Each environment sits on top of an existing "base" Python and, by default, cannot see the packages installed in that base. Of the properties the official documentation lists, three are worth remembering:
- Disposable: it should be easy to delete and recreate, so never keep your own code inside it.
- Not in source control: you do not commit it to Git; you commit a package list instead.
- Not movable: instead of copying or moving it, you recreate it in the new location.
How to create a venv
- Open a terminal and move into your project folder, for example
cd my-project. - Run the create command for your system:
py -m venv .venvon Windows orpython3 -m venv .venvon macOS and Linux. The last argument is the folder name, and.venvis the name the Python Packaging User Guide uses. - Wait a few seconds while Python builds the folder and installs pip into it. pip is added by default unless you pass
--without-pip.
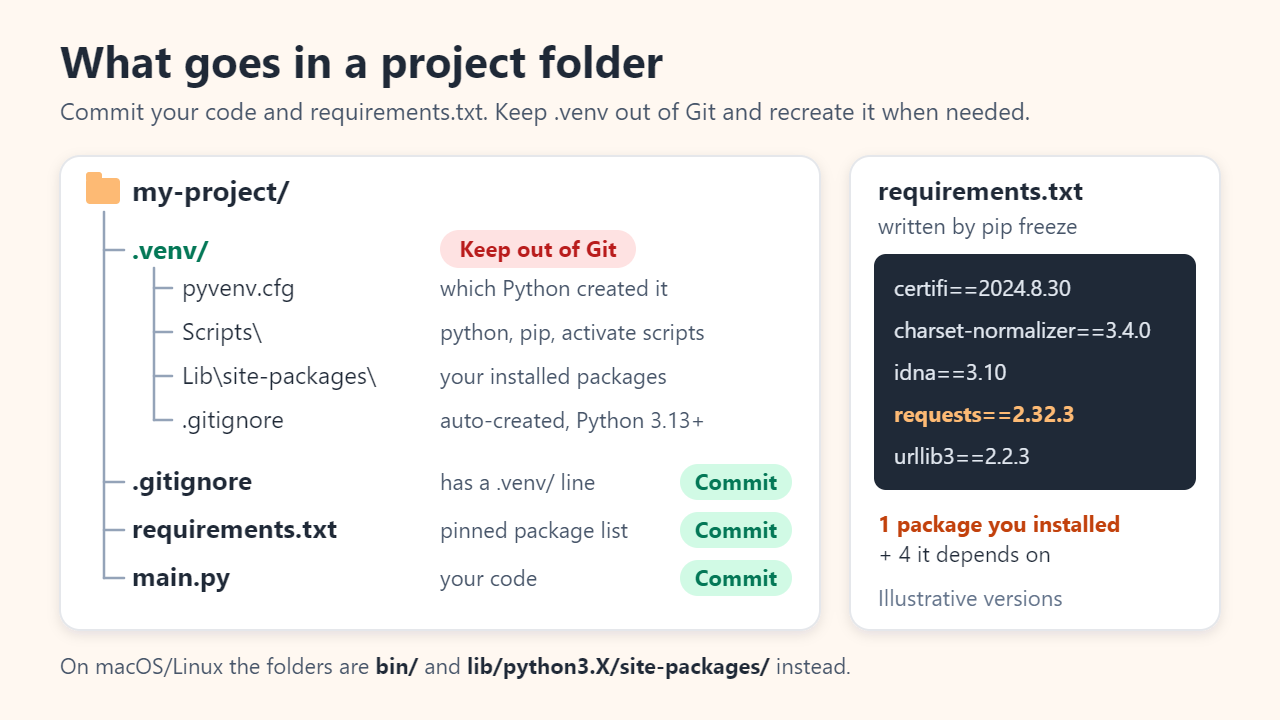
Inside .venv you will find a pyvenv.cfg file whose home key points to the Python that created it, a Scripts folder on Windows (bin on macOS and Linux) holding python, pip and the activation scripts, and Lib\site-packages (lib/pythonX.Y/site-packages elsewhere) where your packages will land. Since Python 3.13, venv also writes a .gitignore file inside the environment folder by default, so Git skips it automatically.
How to activate a venv on Windows, macOS and Linux
Activation puts the environment's Scripts or bin folder at the front of your PATH, so typing python or pip runs the copies inside .venv. Run the command that matches your shell from the project folder:
| System and shell | Activate command |
|---|---|
| Windows PowerShell | .venv\Scripts\Activate.ps1 |
| Windows Command Prompt (cmd) | .venv\Scripts\activate.bat |
| macOS/Linux, bash or zsh | source .venv/bin/activate |
| macOS/Linux, fish | source .venv/bin/activate.fish |
| PowerShell on macOS/Linux (pwsh) | .venv/bin/Activate.ps1 |
When it works, your prompt usually gains a (.venv) prefix. To double-check, run Get-Command python in PowerShell, where python in Command Prompt or which python on macOS and Linux; the path shown first should point inside .venv. (In PowerShell, where is an alias for a different command, which is why it gives no useful answer there.)
Activation is a convenience, not a requirement. You can always call the environment's interpreter directly, for example .venv\Scripts\python app.py or .venv/bin/python app.py. Activation also lasts only for the current terminal window, so reactivate it whenever you open a new one.
Install packages and save them to requirements.txt
With the environment active, install packages as usual. Writing python -m pip instead of plain pip guarantees that pip runs under the same interpreter that python points to:
python -m pip install requests
python -m pip freeze > requirements.txt
pip freeze prints every installed package as a pinned name==version line, which is exactly the format pip install reads back, and the official Python tutorial calls saving it as requirements.txt a common convention. Expect more lines than you typed: installing requests alone also pulls in its four dependencies (certifi, charset-normalizer, idna and urllib3), as Figure 3 shows.
To rebuild the same setup on another computer, or after deleting a broken environment, create and activate a fresh venv and run python -m pip install -r requirements.txt.
Deactivate, delete and keep .venv out of Git
Type deactivate to leave the environment; closing the terminal has the same effect. A venv has no uninstall command. To delete it, deactivate first and then remove the folder:
- PowerShell:
Remove-Item -Recurse -Force .venv - Command Prompt:
rmdir /s /q .venv - macOS/Linux:
rm -rf .venv
Deleting it in File Explorer or Finder works just as well. Your code and requirements.txt are untouched, so getting the environment back takes only the create, activate and install commands. Do the same if you move or rename the project folder: files inside a venv store absolute paths, so recreating it is faster and safer than repairing it.
For Git, add a .venv/ line to your project's own .gitignore. Python 3.13 and later already drop an ignore file inside the environment, but the explicit line also protects teammates on older versions. Commit requirements.txt instead of the environment itself.
Troubleshooting common venv problems
| Symptom | Likely cause | Fix |
|---|---|---|
PowerShell refuses to run Activate.ps1 ("running scripts is disabled on this system") | The PowerShell execution policy blocks scripts; on Windows client PCs the default effective policy is Restricted | Run Set-ExecutionPolicy -ExecutionPolicy RemoteSigned -Scope CurrentUser once, as the Python docs suggest, or use Command Prompt and activate.bat |
| Packages are installed, but VS Code still reports an import error | The editor is using a different interpreter | Open the Command Palette, run Python: Select Interpreter and pick the one inside .venv |
| pip installed a package into the global Python | The environment is not active in this terminal | Activate it, confirm with Get-Command or which, and use python -m pip |
| The venv stopped working after moving or renaming the folder | Absolute paths inside the environment | Delete .venv and rebuild it from requirements.txt |
| Debian/Ubuntu: "ensurepip is not available" | venv support is packaged separately | Install python3-venv (or the versioned python3.X-venv), delete the half-made folder, create again |
If you would rather not change the policy permanently, Set-ExecutionPolicy -ExecutionPolicy RemoteSigned -Scope Process applies only until that PowerShell window closes.
FAQ
Should I name it venv or .venv?
Either works; the documentation calls both conventional. .venv is what the Python Packaging User Guide uses, and the leading dot hides it from normal folder listings on macOS and Linux. Whichever name you pick, use the same one in .gitignore.
Can a venv use a different Python version?
A venv always uses the Python that created it. For a Python 3.12 environment, create it with that interpreter, for example py -3.12 -m venv .venv with the Windows launcher or python3.12 -m venv .venv on macOS and Linux, provided that version is installed.
How can my code tell that it is running inside a venv?
Check sys.prefix != sys.base_prefix; it is True inside a virtual environment. Don't rely on the VIRTUAL_ENV variable, because only activation sets it and activation is optional.
Sources: Python documentation: venv, creation of virtual environments; Python tutorial: Virtual Environments and Packages; Python Packaging User Guide: install packages in a virtual environment using pip and venv; Microsoft Learn: about_Execution_Policies.
Related reading
Original illustrations created to help explain this article.